NextJS with PWA

Progressive Web Apps (PWAs) are web applications that provide a native app-like experience to users. If you're building a Next.js website, adding PWA support can improve the user experience and engagement.
With the next-pwa plugin, it's easy to add PWA support to your website. In this tutorial, we'll cover everything from installing the plugin and configuring the PWA manifest to registering the service worker and testing the PWA on different devices. By the end of this tutorial, you'll have a fully functional PWA that your users can install on their devices and use offline. Let's get started!
This tutorial use next-pwa (opens in a new tab) by https://github.com/shadowwalker (opens in a new tab).
This tutorial only works with Next.js 9.5 or later. If you're using an older version of Next.js, you can use the legacy version of next-pwa.
Installing
yarn add next-pwaConfiguration
Config the PWA within your next.config.js
const runtimeCaching = require("next-pwa/cache");
const withPWA = require("next-pwa")({
  dest: "public",
  disable: process.env.NODE_ENV === "development", //i usually do this because i don't need to change any pwa settings in development
});

module.exports = withPWA({
  reactStrictMode: true,
  // your nextjs config
});
There are several config besides dest that you can take a look at Configuration (opens in a new tab).
After you build using next build this will generate public:workbox-*,js and sw.js
Add Manifest file
Create a manifest.json file in your public folder. Make sure all the files are in public folder
{
  "name": "SPDA",
  "short_name": "SPDA",
  "start_url": "/",
  "display": "standalone",
  "theme_color": "#ffffff",
  "background_color": "#ffffff",
  "icons": [
    {
      "src": "/icons/Undip.png",
      "sizes": "192x192",
      "type": "image/png"
    },
    {
      "src": "/icons/Undip.png",
      "sizes": "512x512",
      "type": "image/png"
    }
  ]
}
Add Head Meta
Add this meta option in your _documents.tsx. Change it based on your needs.
import { Html, Head, Main, NextScript } from "next/document";

export default function Document() {
  return (
    <Html lang="en">
      <Head>
        <meta name="application-name" content="SPDA" />
        <meta name="apple-mobile-web-app-capable" content="yes" />
        <meta name="apple-mobile-web-app-status-bar-style" content="default" />
        <meta name="apple-mobile-web-app-title" content="SPDA" />
        <meta name="description" content="Best PWA App in the world" />
        <meta name="format-detection" content="telephone=no" />
        <meta name="mobile-web-app-capable" content="yes" />
        <meta name="msapplication-TileColor" content="#2B5797" />
        <meta name="msapplication-tap-highlight" content="no" />
        <meta name="theme-color" content="#000000" />
        <link rel="apple-touch-icon" href="/icons/touch-icon-iphone.png" />
        <link rel="manifest" href="/manifest.json" />
        <link rel="shortcut icon" href="/favicon.ico" />
        <link
          rel="stylesheet"
          href="https://fonts.googleapis.com/css?family=Roboto:300,400,500"
        />
      </Head>
      <body>
        <Main />
        <NextScript />
      </body>
    </Html>
  );
}
Finish
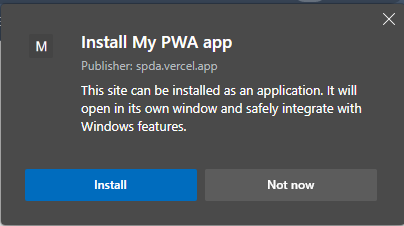
After you finish all the step above you are all set! Pop up install will be show when you build your web app.
In conclusion, adding PWA support to your Next.js website can be a great way to improve the user experience and engagement of your users. With the next-pwa plugin, it's easy to add PWA support to your project and provide a seamless user experience, even when the user is offline.